
Intro
Bitcoin is a decentralized digital currency that enables peer-to-peer transactions without the need for a central authority. It’s possible to participate to the network by installing a Bitcoin node.
A node ensures you have full control over your transactions, don’t rely on other entity, and directly participates in the Bitcoin network’s security and decentralization. It empowers you to verify transactions independently, enhancing your privacy and trust in the system.
Don’t trust, verify…
This guide will walk you through the process of installing a Bitcoin node and Electrs using Docker. By leveraging Docker, you can streamline the deployment and management of these services. Whether you’re a developer or an enthusiast, this step-by-step tutorial will simplify your setup process. Let’s dive into creating a robust and efficient Bitcoin node infrastructure.
Prerequisite
Before we start, ensure you have the following prerequisites:
- A server or machine with Docker installed.
- Basic understanding of Docker concepts such as containers, images, and volumes.
- Docker Compose.
Bitcoin
Configuration
To facilitate integration with other services, create a docker network using the command:
docker network create --driver=bridge --subnet=192.168.10.0/28 --gateway=192.168.10.1 bitcoin-networkCreate a bitcoin folder and add the docker-compose.yml file with the content below:
services:
  bitcoin:
    container_name: bitcoind
    user: 1000:1000
    image: lncm/bitcoind:v25.0
    volumes:
      - ./data:/data/.bitcoin
    restart: unless-stopped
    stop_grace_period: 15m30s
    networks:
      bitcoin-network:
        ipv4_address: 192.168.10.2

networks:
  bitcoin-network:
    name: bitcoin-network
    external: true
Add the ./data/bitcoin.conf file with the following content:
# RPC password
rpcauth=<user>:<password>

# bind on bitcoin-network ip
rpcbind=192.168.10.2
rpcallowip=192.168.10.0/28

# bind on local for bitcoin-cli and other local tools
rpcbind=127.0.0.1
rpcallowip=127.0.0.1/32
You can generate the <user> and <password> data using the website https://jlopp.github.io/bitcoin-core-rpc-auth-generator/. For example for the user user and password password, the result will be rpcauth=user:a25ea0ca3f3d8ab20c3dce3959223427$05533202f12c57937a438c329fce23f9d2aff46b66db0d0d5ced785b4e598414.
You can now start the bitcoin daemon using the command:
docker cimpose up -dCheck the status using the command:
docker exec -it bitcoind bitcoin-cli -getinfo
The result should be something like:
Chain: main
Blocks: 0
Headers: 34041
Verification progress: ▒░░░░░░░░░░░░░░░░░░░░ 0.0000%
Difficulty: 1

Network: in 0, out 7, total 7
Version: 250000
Time offset (s): 0
Proxies: n/a
Min tx relay fee rate (BTC/kvB): 0.00001000

Warnings: (none)
Tor proxy
Connecting a Bitcoin node to the Tor network enhances privacy by hiding the node’s public IP, allowing anonymity. In certain countries, using the Tor network also protects against censorship.
To allow the bitcoin node to connect to other peers using the Tor network, we will create a proxy service in the docker-compose.yml
Edit the file as following:
services:
  tor:
    image: dockurr/tor
    container_name: bitcoind_tor
    user: 100:100
    networks:
      internal:
        ipv4_address: 10.254.0.2
    volumes:
      - ./tor/config:/etc/tor
      - ./tor/data:/var/lib/tor
    stop_grace_period: 1m
    restart: unless-stopped

  bitcoin:
    container_name: bitcoind
    user: 1000:1000
    image: lncm/bitcoind:v25.0
    volumes:
      - ./data:/data/.bitcoin
    restart: unless-stopped
    stop_grace_period: 15m30s
    networks:
      internal:
        ipv4_address: 10.254.0.3
      bitcoin-network:
        ipv4_address: 192.168.10.2
    depends_on:
      - tor

networks:
  bitcoin-network:
    name: bitcoin-network
    external: true
  internal:
    ipam:
      config:
        - subnet: 10.254.0.0/29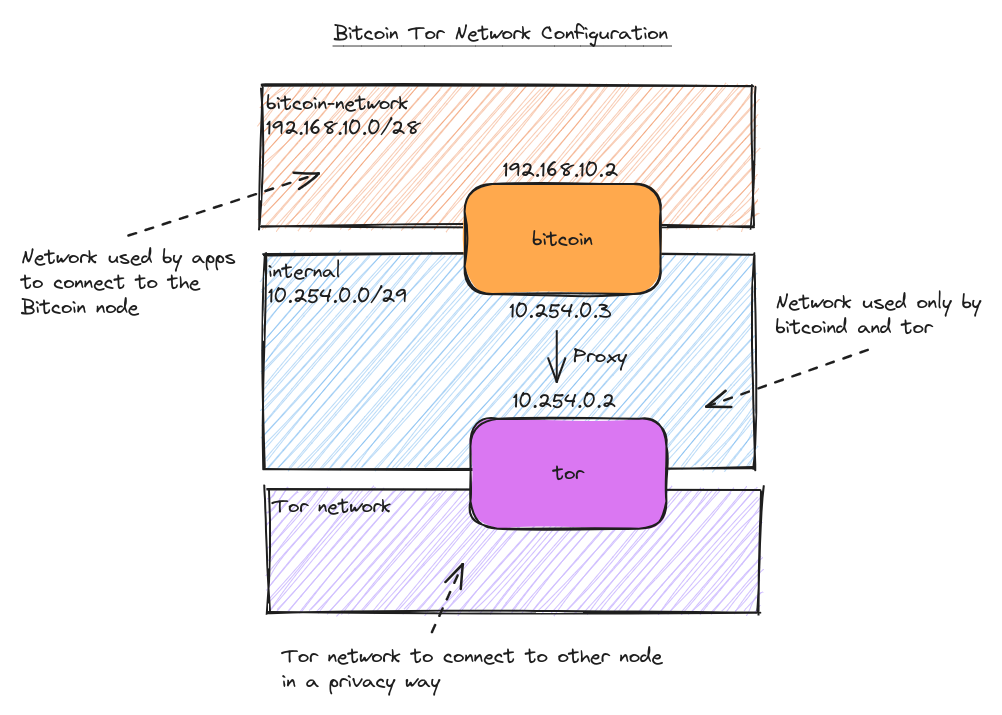
Note
Here, we use another network,
internal, to ensure only the Bitcoin service can access the Tor proxy. Since the Bitcoin configuration requires an IP address, it is more convenient to set a static IP for the internal network.
Generate a Tor control password using the command:
docker run --rm -it dockurr/tor sh -c "tor --hash-password '<password>'"The command should output something like (generated from password string):
16:DD7019314EE1206460EB8DE377D10DF7FEEDD07CB14DAC11003E1D7E64Then, create the Tor configuration file tor/config/torrc:
HardwareAccel 1
Log notice stdout
DNSPort 10.254.0.2:8853
SocksPort 10.254.0.2:9050
ControlPort 10.254.0.2:9051
DataDirectory /var/lib/tor

HashedControlPassword <generated_password>
You can now verify that the Tor service works correctly by using the command:
docker compose up tor
Note
If you encounter a warning saying
[warn] /var/lib/tor is not owned by this user (tor, 100) but by root (0). Perhaps you are running Tor as the wrong user?, you can resolve it by running the commandsudo chown -R 100:100 ./tor/datato set the correct permissions for thetoruser in the./tor/datafolder.
Update your bitcoin.conf file to add the tor configuration:
# RPC password
rpcauth=<user>:<password>

# bind on bitcoin-network ip
rpcbind=192.168.10.2
rpcallowip=192.168.10.0/28

# bind on local for bitcoin-cli and other local tools
rpcbind=127.0.0.1
rpcallowip=127.0.0.1/32

# tor configuration
onion=10.254.0.2:9050
onlynet=onion
torcontrol=10.254.0.2:9051
torpassword=<tor_password>

# allow incoming connections
listen=1
Now, start all the services using:
docker compose up -dVerify that bitcoin node is using tor network:
docker exec -it bitcoind bitcoin-cli -netinfoThe result should be something like:
Bitcoin Core client v25.0.0 - server 70016/Satoshi:25.0.0/

        onion   total   block
in          0       0
out        10      10       2
total      10      10

Local addresses: n/a
Electrs
Introduction
Electrs (Electrum Rust Server) is a lightweight, fast, and efficient Electrum server implementation in Rust. It is designed to run alongside a Bitcoin full node, enabling users to self-host their own Electrum server with minimal additional hardware requirements beyond those needed for the full node.
An Electrum server continuously indexes the Bitcoin blockchain, enabling users to efficiently track their wallets. Numerous wallets are compatible with an Electrum server, and by installing one on your own machine, you eliminate the need to rely on external servers for your data. This setup provides you with full control over your wallet information and enhances your privacy.
Configuration
Note
Since there is no official Electrs Docker image available, we will create our own.
Create a folder electrs and a docker-compose.yml file with the content below:
services:
 electrs:
   container_name: electrs
   build:
     context: ./
     args:
       VERSION: "v0.10.5"
   image: docker-electrs
   volumes:
     # electrs configuration file
     - ./config/config.toml:/data/.electrs/config.toml
     # electrs database
     - /data/electrs:/electrs/data
     # bitcoind data, replace with the correct path
     - /data/bitcoin:/data/.bitcoin:ro
   restart: always
   networks:
     bitcoin-network:
       ipv4_address: 192.168.10.3
   ports:
     - 50001:50001
And a Dockerfile:
# Based on
# https://github.com/getumbrel/docker-electrs/blob/master/Dockerfile
# https://github.com/iangregsondev/electrs-docker/blob/main/Dockerfile

FROM rust:1-slim-bookworm AS builder

ARG VERSION

WORKDIR /build

RUN apt-get update
RUN apt-get install -y git clang cmake build-essential libsnappy-dev
RUN apt-get install -y librocksdb-dev

RUN git clone --branch $VERSION https://github.com/romanz/electrs .

# cargo under QEMU building for ARM can consumes 10s of GBs of RAM...
# Solution: https://users.rust-lang.org/t/cargo-uses-too-much-memory-being-run-in-qemu/76531/2
ENV CARGO_NET_GIT_FETCH_WITH_CLI true

RUN cargo build --release --bin electrs

FROM debian:bookworm-slim

RUN adduser --disabled-password --uid 1000 --home /data --gecos "" electrs
USER electrs
WORKDIR /data

COPY --from=builder /build/target/release/electrs /bin/electrs

# Electrum RPC
EXPOSE 50001

STOPSIGNAL SIGINT

ENTRYPOINT ["electrs"]
You can now build the docker image using
docker compose buildCreate the config file config/config.toml with the following content:
# Use password auth
auth="<bitcoin_rpc_user>:<bitcoin-rpc-password>"

# The listening RPC address of bitcoind port 8332
daemon_rpc_addr = "192.168.10.2:8332"

# The listening P2P address of bitcoind port 8333
daemon_p2p_addr = "192.168.10.2:8333"

# Directory where the index should be stored. It should have at least 70GB of free space.
db_dir = "/electrs/data/"

# bitcoin means mainnet. Don't set to anything else unless you're a developer.
network = "bitcoin"

# The address on which electrs should listen. Warning: 0.0.0.0 is probably a bad idea!
# Tunneling is the recommended way to access electrs remotely.
electrum_rpc_addr = "192.168.10.3:50001"

# How much information about internal workings should electrs print. Increase before reporting a bug.
log_filters = "INFO"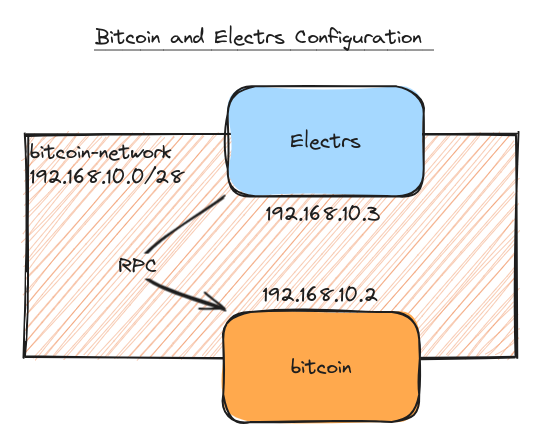
And now you can start the container bu running:
docker compose up -dConclusion
With this configuration, you now have a fully functioning Bitcoin node with an Electrum server alongside it, enabling you to perform secure and efficient transactions, manage your wallet, and serve lightweight clients by providing them with fast and reliable access to the Bitcoin blockchain.
Resources
- Photo by Shubham Dhage on Unsplash
bitcoinGithub: https://github.com/bitcoin/bitcoinbitcoinDocker image: https://github.com/lncm/docker-bitcoindelectrsGithub: https://github.com/romanz/electrstorDocker image: https://github.com/dockur/tor