Intro
Nextcloud is a powerful open-source platform for hosting your own cloud storage solution, offering robust features for file synchronization, sharing, and collaboration.
Setting up Nextcloud using Docker simplifies the deployment process, providing an isolated and consistent environment that can be easily managed and scaled.
In this blog, we’ll walk you through the basics of configuring Nextcloud in Docker, enabling you to set up your private cloud quickly and efficiently.
Prerequisite
Before we start, ensure you have the following prerequisites:
- A server or machine with Docker installed.
- Basic understanding of Docker concepts such as containers, images, and volumes.
- Docker Compose.
Installation
Create a nextcloud folder:
mkdir nextcloud && cd nextcloudCreate a .env file and add the content below:
MYSQL_ROOT_PASSWORD=<root_password>
MYSQL_USER=nextcloud
MYSQL_PASSWORD=<mysql_password>
MYSQL_DATABASE=nextcloud
MYSQL_HOST=db
REDIS_HOST=redis
Make sure to replace <root_password>, <mysql_password> and <hostname> with your actual credentials and server details.
Create a docker-compose.yml file with following the content:
services:
  db:
    image: mariadb:10.11
    container_name: mariadb-database
    command: --transaction-isolation=READ-COMMITTED --log-bin=binlog --binlog-format=ROW
    volumes:
      - ./data/db_data:/var/lib/mysql
    environment:
      - MYSQL_ROOT_PASSWORD
      - MYSQL_USER
      - MYSQL_PASSWORD
      - MYSQL_DATABASE
    restart: unless-stopped

  redis:
    image: redis:alpine
    container_name: redis-dbcache
    restart: unless-stopped

  nextcloud:
    image: nextcloud
    container_name: nextcloud-app
    ports:
      - 8080:80
    volumes:
      - ./data/app:/var/www/html:z
    environment:
      - MYSQL_USER
      - MYSQL_PASSWORD
      - MYSQL_DATABASE
      - MYSQL_HOST
      - REDIS_HOST
    restart: unless-stopped
    depends_on:
      - db
      - redis

  cron:
    image: nextcloud
    container_name: nextcloud-cron
    volumes:
      - ./data/app:/var/www/html:z
    entrypoint: /cron.sh
    restart: unless-stopped
    depends_on:
      - db
      - redis
Then, start the nextcloud container by running:
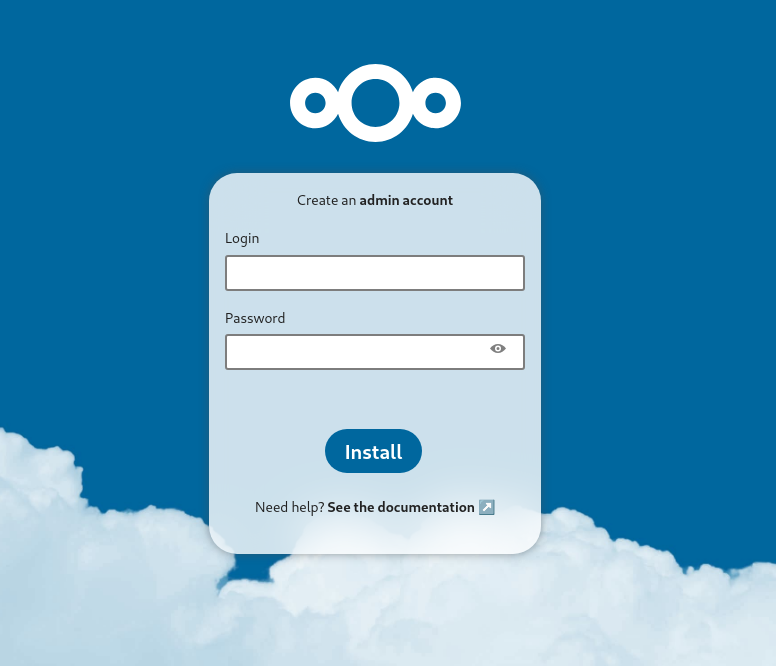
docker compose up -dYou should now be able to access the setup page at the url http://localhost:8080.
Configure HTTPS
Using HTTPS on a self-hosted cloud service is crucial to ensure data privacy and integrity by encrypting communications, and to protect against man-in-the-middle attacks. To securely access your server, it’s crucial to enable the HTTPS protocol.
To achieve this, we will use the Caddy reverse proxy because of it’s simplicity. Check out my guide 01-caddy-in-docker to see how to configure it using docker.
You can add the basic reverse_proxy configuration below in your Caddyfile :
cloud.domain.name {
    reverse_proxy http://nextcloud-app:80
}
If you use a wildcard certificate like explained in this guide 09-caddy-wildcard-certificates, you can use this configuration :
@nextcloud host cloud.domain.name
handle @nextcloud {
    reverse_proxy http://nextcloud-app:80
}
Add the necessary environment variables for reverse proxying HTTP requests:
MYSQL_ROOT_PASSWORD=<root_password>
MYSQL_USER=nextcloud
MYSQL_PASSWORD=<mysql_password>
MYSQL_DATABASE=nextcloud
MYSQL_HOST=db
REDIS_HOST=redis
OVERWRITEPROTOCOL=https
TRUSTED_PROXIES=<caddy_container_ip>
APACHE_DISABLE_REWRITE_IP=1
OVERWRITEHOST=cloud.domain.name
Note
You can get the ip of the caddy container ip with the command
docker exec -it caddy ifconfig eth0 | awk -F ' *|:' '/inet addr/{print $4}'
Next, edit the Nextcloud docker-compose.yml file to include the caddy network:
services:
  db:
    image: mariadb:10.11
    container_name: mariadb-database
    networks:
      - internal
    command: --transaction-isolation=READ-COMMITTED --log-bin=binlog --binlog-format=ROW
    volumes:
      - ./data/db_data:/var/lib/mysql
    environment:
      - MYSQL_ROOT_PASSWORD
      - MYSQL_USER
      - MYSQL_PASSWORD
      - MYSQL_DATABASE
    restart: unless-stopped

  redis:
    image: redis:alpine
    container_name: redis-dbcache
    networks:
      - internal
    restart: unless-stopped

  nextcloud:
    image: nextcloud
    container_name: nextcloud-app
    networks:
      - caddy
      - internal
    volumes:
      - ./data/app:/var/www/html:z
    environment:
      - MYSQL_USER
      - MYSQL_PASSWORD
      - MYSQL_DATABASE
      - MYSQL_HOST
      - REDIS_HOST
      - OVERWRITEPROTOCOL
      - TRUSTED_PROXIES
      - APACHE_DISABLE_REWRITE_IP
      - OVERWRITEHOST
    restart: unless-stopped
    depends_on:
      - db
      - redis

  cron:
    image: nextcloud
    container_name: nextcloud-cron
    networks:
      - internal
    volumes:
      - ./data/app:/var/www/html:z
    entrypoint: /cron.sh
    restart: unless-stopped
    depends_on:
      - db
      - redis

networks:
  caddy:
    name: caddy
    external: true
  internal: {}
Note
The name of the
caddynetwork may vary based on your configuration and the name you’ve assigned to it.
Here, only the nextcloud-app service needs to be accessed by Caddy. All other services are isolated within an internal network to prevent conflicts with other services, such as a separate redis instance. Additionally, you can remove the port mapping since the service will be accessible via the subdomain through Caddy.
Now you can restart the Nextcloud service using the command :
docker compose down && docker compose up -dYou can now access your nextcloud instance using https://cloud.domain.name!
Add SMTP
SMTP settings enable the Nextcloud service to send email notifications to users. It can be useful to reset a password for example.
Note
In this example, I will use Gmail’s SMTP service. However, you can easily adapt these settings for any other email provider that supports SMTP.
To configure the mail service, you will need to add the following environment variables to your .env file:
MYSQL_ROOT_PASSWORD=<root_password>
MYSQL_USER=nextcloud
MYSQL_PASSWORD=<mysql_password>
MYSQL_DATABASE=nextcloud
MYSQL_HOST=db
REDIS_HOST=redis
OVERWRITEPROTOCOL=https
TRUSTED_PROXIES=<caddy_container_ip>
APACHE_DISABLE_REWRITE_IP=1
OVERWRITEHOST=cloud.domain.name
SMTP_HOST=smtp.gmail.com
SMTP_SECURE=ssl
SMTP_PORT=465
SMTP_NAME=address@gmail.com
SMTP_PASSWORD=secure password
MAIL_FROM_ADDRESS=from
MAIL_DOMAIN=cloud.domain.name
Warning
If you have 2FA enabled on your gmail account, you can’t use your regular password with gmail. You will need to generate an app password like described here: https://support.google.com/accounts/answer/185833?hl=en
The final docker-compose.yml file should look like this:
services:
  db:
    image: mariadb:10.11
    container_name: mariadb-database
    networks:
      - internal
    command: --transaction-isolation=READ-COMMITTED --log-bin=binlog --binlog-format=ROW
    volumes:
      - ./data/db_data:/var/lib/mysql
    environment:
      - MYSQL_ROOT_PASSWORD
      - MYSQL_USER
      - MYSQL_PASSWORD
      - MYSQL_DATABASE
    restart: unless-stopped

  redis:
    image: redis:alpine
    container_name: redis-dbcache
    networks:
      - internal
    restart: unless-stopped

  nextcloud:
    image: nextcloud
    container_name: nextcloud-app
    networks:
      - caddy
      - internal
    ports:
      - 8080:80
    volumes:
      - ./data/app:/var/www/html:z
    environment:
      - MYSQL_USER
      - MYSQL_PASSWORD
      - MYSQL_DATABASE
      - MYSQL_HOST
      - REDIS_HOST
      - OVERWRITEPROTOCOL
      - TRUSTED_PROXIES
      - APACHE_DISABLE_REWRITE_IP
      - OVERWRITEHOST
      - SMTP_HOST
      - SMTP_SECURE
      - SMTP_PORT
      - SMTP_NAME
      - SMTP_PASSWORD
      - MAIL_FROM_ADDRESS
      - MAIL_DOMAIN
    restart: unless-stopped
    depends_on:
      - db
      - redis

  cron:
    image: nextcloud
    container_name: nextcloud-cron
    networks:
      - internal
    volumes:
      - ./data/app:/var/www/html:z
    entrypoint: /cron.sh
    restart: unless-stopped
    depends_on:
      - db
      - redis

networks:
  caddy:
    name: caddy
    external: true
  internal: {}
You should see the correct settings reflected in the admin panel accessible here: https://cloud.domain.name/settings/admin.
Conclusion
By following these steps, you’ve successfully configured Nextcloud with Docker and set up secure HTTPS access using Caddy. Your Nextcloud instance is now capable of sending email notifications through your chosen SMTP service. With everything in place, you can enjoy a secure and fully functional private cloud storage solution.
Resources
- Nextcloud website: https://nextcloud.com/
- Docker image: https://hub.docker.com/_/nextcloud/
- Caddy documentation: https://caddyserver.com/docs/
- Google App password: https://support.google.com/accounts/answer/185833?hl=en
- Photo by CHUTTERSNAP on Unsplash