
Intro
AdGuard Home is a software that protect you from advertising and tracking enhancing your privacy. It work as a DNS filter so can work on all your devices without the need to install client, no matter the type or the operating system of the device.
AdGuard Home is free, open-source, self-hostable and open to customization. The official documentation and source code can be found on the github.
Warning
For your DNS server to be utilized across all your devices, it’s essential to configure a static IP address.
Prerequisite
- Docker
- A static IP
Run AdGuard Home in Docker
Docker compose file
Create a adguard folder:
mkdir adguard
cd adguard
Create a docker-compose.yml file:
version: "2"
services:
  adguardhome:
    image: adguard/adguardhome
    container_name: adguardhome
    restart: unless-stopped
    ports:
      - 53:53/tcp
      - 53:53/udp
      - 443:443/tcp
      - 784:784/udp
      - 853:853/tcp
      - 3000:3000/tcp
      - 5443:5443/tcp
      - 5443:5443/udp
      - 80:80/tcp
    volumes:
      - ./work:/opt/adguardhome/work
      - ./conf:/opt/adguardhome/conf
AdGuard can require a lot of port mapping:
3000for initial setup53for the DNS server80for the web interface default port443for DNS-over-TLS784for DNS-over-QUIC853for DNS-over-TLS5443for a DNSCrypt server
In this example, we will exclusively utilize the basic DNS server. We will also maintaining port 3000 for the admin interface. This choice helps prevent conflicts with other services, such as reverse-proxy or web-server services, that commonly utilize port 80.
version: "2"
services:
  adguardhome:
    image: adguard/adguardhome
    container_name: adguardhome
    restart: unless-stopped
    ports:
      - 53:53/tcp
      - 53:53/udp
      - 3000:3000/tcp
    volumes:
      - ./work:/opt/adguardhome/work
      - ./conf:/opt/adguardhome/conf
Before initiating the container, verify whether a DNS server is currently running on your system by executing the following command:
netstat -nlp | grep ":53 "On Ubuntu-like systems, a DNS server is integrated with systemd. You can disable it using the following command:
systemctl stop systemd-resolved.serviceNow, you can start the container using the command:
docker compose up -dWeb Setup
Once the container started, you can visit the URL http://127.0.0.1:3000 to access the web interface.
Note
For remote installations, you can replace the IP address
127.0.0.1with the actual IP address of the machine where AdGuard is installed, such as192.168.1.37for example.
You should see the Welcome screen:
Create the basic configuration, changing the Admin Web Interface port to 3000 instead of 80. Maintain the default DNS port as 53.

Create a username and password that will be used to connect to the web interface.

After the Welcome process finished, refresh the URL http://127.0.0.1 to access the login interface.

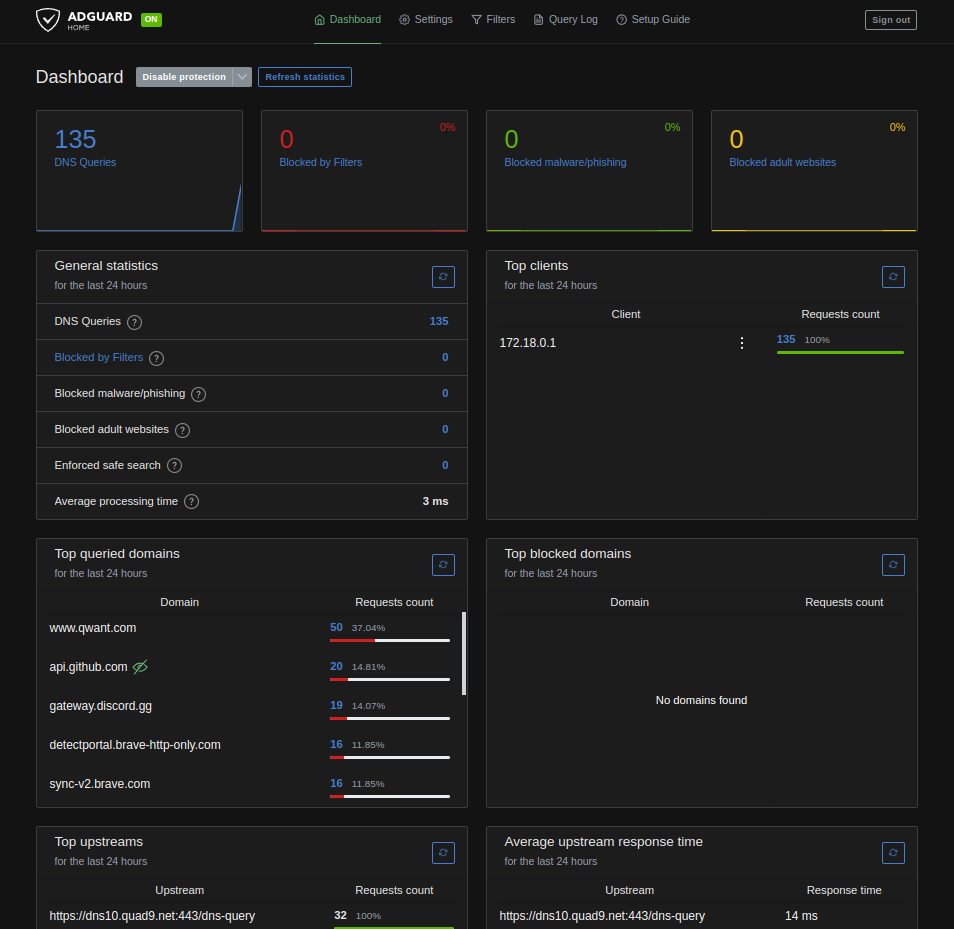
You should be able to access the Dashboard.
Testing
To confirm the correct setup of the DNS, you can use nslookup to query the DNS for the resolution of a domain name. If the server is configured properly, the command should return the IP address associated with the specified domain name.
For example, run the nslookup command below:
nslookup google.com 127.0.0.1The command should return a response similar to the following:
Server:         127.0.0.1
Address:        127.0.0.1#53

Non-authoritative answer:
Name:   google.com
Address: 142.250.179.110
Name:   google.com
Address: 2a00:1450:4007:818::200e
Router configuration
To configure this custom DNS for all your home devices, you’ll need to set up the correct configuration directly on your router. Typically, the DHCP server, responsible for assigning IP addresses, also transmits the DNS address. In many cases, the router handles both DNS and DHCP server functions. The configuration details may vary depending on the type of router you are using.
In certain situations, some routers may not support or provide limited options for custom DNS settings. In such cases, you should have the option to disable the DNS and DHCP services on your router and utilize the DNS and DHCP services provided by AdGuard Home. AdGuard Home does support DHCP services, allowing you to manage both DNS and DHCP functionalities from within the AdGuard Home environment.
Configure DHCP
Configuration
Warning
It’s crucial to have only one DHCP server active on your network at a time. Running multiple DHCP services simultaneously can lead to issues such as duplicate IP assignments and unpredictable network behavior. If you decide to use AdGuard Home’s DHCP service, ensure that the DHCP service on your router is disabled to maintain a stable and well-managed network environment.
Warning
Ensure to set up a static IP address without relying on DHCP for your server. Since your server will be serving as the DHCP provider, it cannot assign itself an IP configuration dynamically.
Configuring AdGuard Home with DHCP becomes more straightforward by utilizing the host Docker network driver.
Edit the docker-compose.yml file as follows:
version: "2"
services:
  adguardhome:
    image: adguard/adguardhome
    container_name: adguardhome
    restart: unless-stopped
    network_mode: host
    volumes:
      - ./work:/opt/adguardhome/work
      - ./conf:/opt/adguardhome/conf
Then, visit https://127.0.0.1/#dhcp
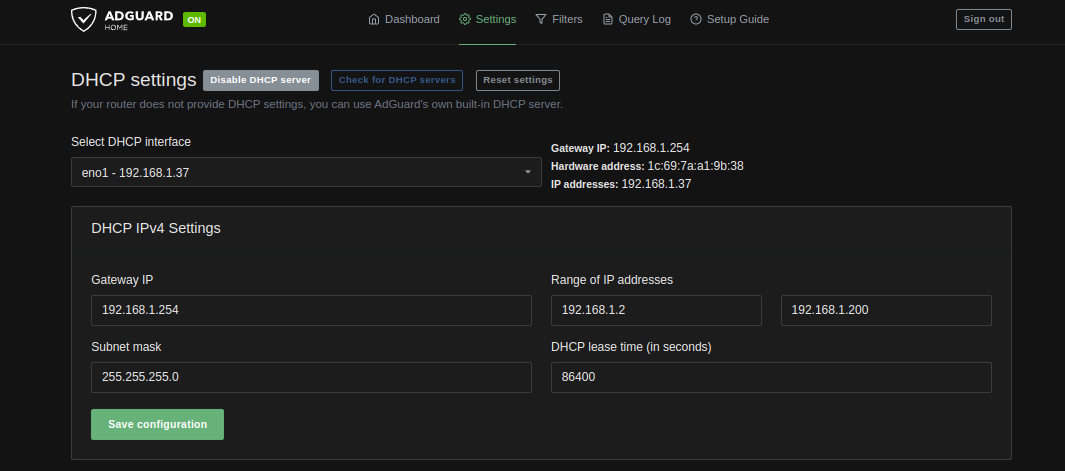
Specify your network interface that is connected to your local network, in my case, eno1, with an IP set to 192.168.1.37.
For the DHCP IPv4 settings, you can choose any range of IP addresses, subnet mask, and DHCP lease time. Specify the Gateway IP as the IP address of your router; in my case, it’s 192.168.1.254.
Testing
To verify your DHCP setup, you can run the nmap command on your device:
sudo nmap --script broadcast-dhcp-discover
Upon successful configuration, you should observe an IP Offered within the designated range, the accurate Router value, and a Domain Name Server pointing to the IP address of your AdGuard Home server.
DHCP static leases
To allocate specific IP addresses for particular devices through your DHCP server, you can use the DHCP static leases functionality.
Click on the Add static lease button and enter the MAC address of your device, the reserved IP, and the hostname.
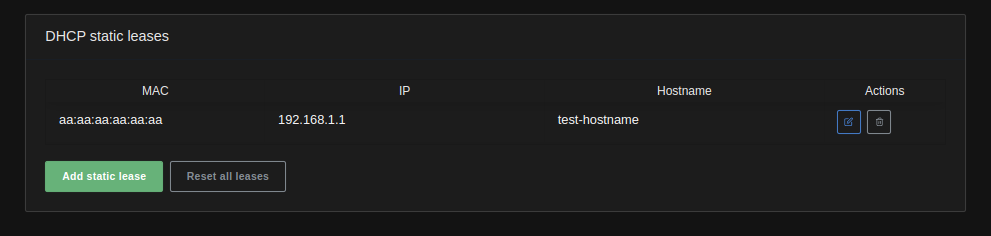
In this example, the device with the MAC address aa:aa:aa:aa:aa:aa will always receive the IP address 192.168.1.1 from the DHCP server due to the static lease configuration.
Configure Caddy
If you have setup a Caddy instance with docker and a wildcard certificates configuration, the configuration should be easy to setup.
Network mode Host
If you have the network_mode: host configuration in your AdGuard Home docker-compose.yml, you need to know the host IP from Caddy, to properly redirect data to the correct service.
To get the IP of the host from the caddy container, execute:
docker exec -it caddy /sbin/ip route | awk '/default/ { print $3 }' | head -n1Now, you can edit your Caddyfile and add the adguard configuration:
*.domain.name, domain.name {
    tls {
        dns <provider> {env.API_KEY}
    }

    @main host domain.name
    handle @main {
        respond "OK from domain.name"
    }

    @adguard host adguard.domain.name
    handle @adguard {
        reverse_proxy http://<host-ip>:3000
    }
}
Network mode Bridge
If you opt not to employ network_mode: host, the recommended approach is to use the Docker hostname adguardhome within a shared network with Caddy.
Edit your docker-compose.yml:
version: "2"
services:
   adguardhome:
     image: adguard/adguardhome
     container_name: adguardhome
     restart: unless-stopped
     ports:
       - 53:53/tcp
       - 53:53/udp
     volumes:
       - ./work:/opt/adguardhome/work
       - ./conf:/opt/adguardhome/conf
networks:
  default:
     external:
        name: caddy
Note
With this configuration, there’s no longer a need to map port
3000externally, as Caddy will access it directly through the Docker hostnameadguardhome. You can exclusively access it via HTTPS using the subdomainadguard.domain.namefrom Caddy.
Then, use the Caddyfile configuration:
*.domain.name, domain.name {
    tls {
        dns <provider> {env.API_KEY}
    }

    @main host domain.name
    handle @main {
        respond "OK from domain.name"
    }

    @adguard host adguard.domain.name
    handle @adguard {
        reverse_proxy http://adguardhome:3000
    }
}
Hardening
You can refer to my previous post to configure Caddy to AdGuard only in your local network. You can also setup Fail2Ban for Caddy to protect your service.