Prerequisite
To proceed with this guide, ensure you have:
- A functioning fail2ban instance (refer to 03-fail2ban-in-docker)
- A Caddy instance (check out 01-caddy-in-docker)
- Plugin
access-formattedfor Caddy (look 04-install-caddy-plugins to know how to add the plugin).
Return an Unauthorized Error
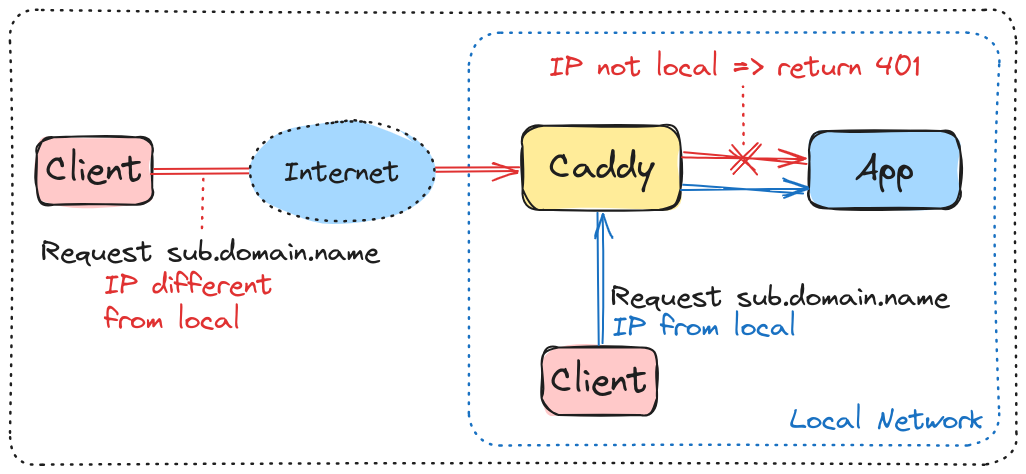
Referencing the earlier post 02-caddy-hardening, update the configuration to permit only the local network, resulting in an unauthorized error (401) response instead of an abort.
(safe) {
    # 192.168.0.0/24: local ip range
    @allowed remote_ip 192.168.0.0/24

    handle {
        # return unauthorized error if
        # the remote IP isn't in the specified range
        respond 401
    }
}
Format Caddy Logs
Add a global configuration on top of your Caddyfile that add a log directive:
{
    log access-log {
        include http.log.access.access-log
        output file /data/access.log
    }
}
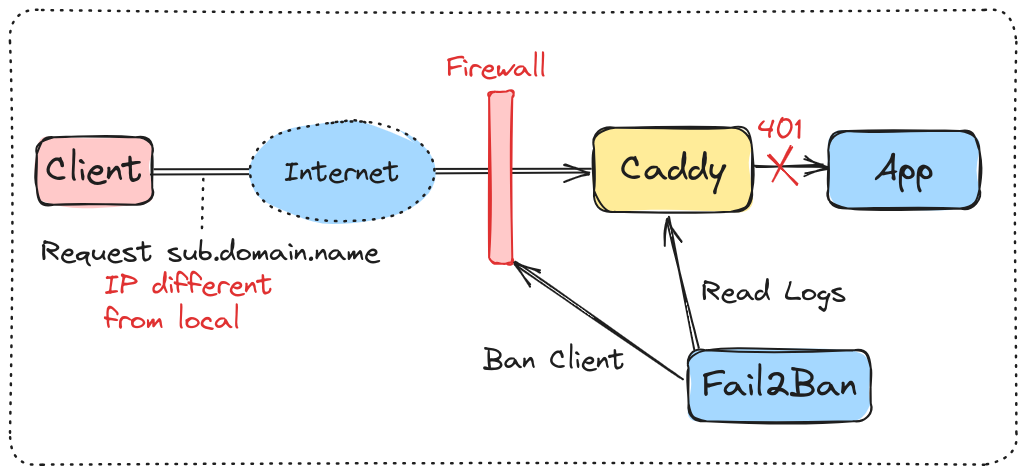
Configured in this manner, all access-log logs will be written to the /data/access.log file, serving as the reference for Fail2Ban to monitor and identify potentially suspicious access.
The Caddy logfile is rich in information. For improved readability and parsing, leverage the transform logging encoder available in the access-formatted plugin.
{
    log access-log {
        include http.log.access.access-log
        output file /data/access.log
        format transform `{ts} {request>headers>X-Forwarded-For>[0]:request>remote_ip} {request>host} {request>method} {request>uri} {status}` {
            time_format "02/Jan/2006:15:04:05"
        }
    }
}
This will standardize the format of each log entry to look like:
23/Dec/2023:17:53:24 192.168.0.24 subdomain.domain.name GET /index 200Create Fail2Ban Filter
On the data/filter.d/ folder, create a file caddy-custom.conf with the content:
# data/filter.d/caddy-custom.conf

[Definition]
# catch all lines that terminate with an unauthorized error
failregex = <HOST> \S+ \S+ \S+ (401)$
ignoreregex =
Create Fail2Ban Jail
On the data/jail.d/ folder, create a file caddy.conf containing:
# data/jail.d/caddy.conf

[caddy]
backend = auto
enabled = true
chain = FORWARD
protocol = tcp
port = http,https
filter = caddy-custom
maxretry = 3
bantime = 86400
findtime = 43200
# replace with the correct path
logpath = /opt/caddy/data/access.log
Configure Fail2Ban Access Log
version: "3.9"

services:
 fail2ban:
   image: crazymax/fail2ban:latest
   container_name: fail2ban
   network_mode: "host"
   cap_add:
     - NET_ADMIN
     - NET_RAW
   volumes:
     - "./data:/data"
     - "/var/log/auth.log:/var/log/auth.log:ro"
      # replace with the correct path
     - "/opt/caddy/data/access.log:/opt/caddy/data/access.log:ro"
   restart: unless-stopped
You can now restart Fail2Ban using the command:
docker compose restartConclusion
Fail2Ban is now set to automatically ban clients attempting to connect to a subdomain configured exclusively for the local network. After three unsuccessful attempts, the client will be restricted from making further requests to the Caddy server.

Ressources
- Fail2Ban Github
- Photo by Baron Gimenez on Unsplash


